How to Add Custom Robots Header Meta Tags and custom robots.txt blogger to Blogger
In the continuation to Blogger's blog seo we are here with two more seo tips that may increase your seo score and will index your website faster. These 2 techniques are Custom Robots header tags and Custom robots.txt. Using both these features in efficient way will give you a boost in search rankings otherwise it will completely destroy your blog's search rankings. So please don't use these techniques unless you know what are you doing.
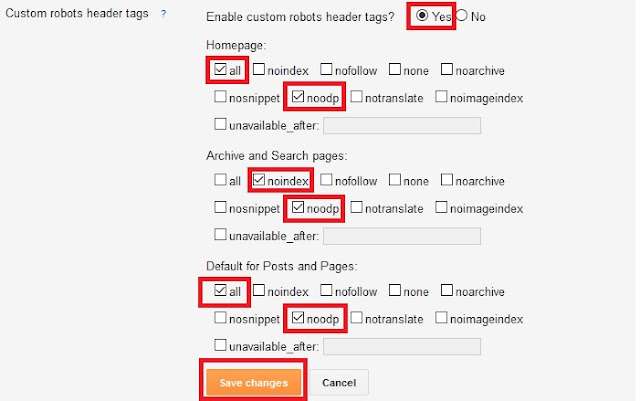
Custom robots header tags are disabled by default in blogger and enabling this will be beneficial from SEO perspectives. These robot headers tells Web crawlers how your site is crawled and what to index and what to leave as it is. By default it is set to all and indexed all of your pages like archive , homepage and search pages. In our Blogger's homepage we have recent articles and their short summary. For Web crawlers it's a sign of duplicate content as it is also present in your pages. So it becomes necessary to use custom robots.txt files. So make changes according to below image and enjoy better search traffic and rankings. But before making any changes please read below definitions of setting options in custom robots header.
1) All : it allows Web crawlers to index all of your Web pages. This is enabled by default.
2) noindex : this setting tells Web crawlers not to index your pages in search results.
3) nofollow : it tells not to follow the links on the pages.
4) none : Equivalent to noindex, nofollow
5) noarchive : it tells not to cache any page in search result page.
6) nosnippet : by default , search engine shows a short snippet of your Web pages. This option will block them from showing snippets in search page.
7) noodp : by default Google uses metadata from DMOZ . This setting will not allow search engines to use metadata from DMOZ directory.
8) notranslate : this will not allow translate option for the page
9) noimageindex : this setting will not allow search engines to index images from your Webpages.
How to add customized robots header in Blogger's blog
Step 1: Log into your blog > dashboard.
Step 2: click settings > Search Preferences
Step 3: now under Crawlers and indexing you will find custom robots.txt and custom robots header tags.
Step 4: click edit on Custom robots header tag and click on Yes to enable this settings.
Step 5: now it's time to customize these settings. I already explained all the settings above now just select options according to below image.
Step 6: save changes. And you are done.
Add Custom Robots Header Tags For Individual Posts and Pages-
Now you just enabled settings for your entire blog. Now it's time to enable Custom Robots header for your individual Posts. When you enable custom robots headers then it will open individual robots header under your posts settings. So just visit your post to edit and click on Custom Robots Tags and setup it according to your need. This setting will override existing settings of your blog.
Now let's see how exactly you can add Custom Robots.txt file in Blogger
You need custom robots.txt blogger generator to generate robots.txt files for your blog. You can do a Google search and you will find many robots.txt generator. Now it's time to enable these settings to make your blog more productive for Web crawlers. Now you can set which pages you can allow to crawl or which are not allowed.
Step 1: follow all steps till step 3 in above tutorial and select robots.txt and click edit.
Slep 2: now paste your generated code in text box.
Step 3: save changes and you are done with your own robot files.
If you feel any difficulties in this tutorial then please comment below and we will help you.

0 comments:
Post a Comment