WELCOME TO EHOST.COM.NP

Tuesday, December 6, 2016

How to Add Google Analytics to Blogger


Google Analytics is a platform created with the purpose of helping us to track the number of visits and page views on our blog, which also uses several filters to check exactly from where the visitors are coming via standard or custom reports.


Google Analytics is the leading free tool that has a good relationship with the internet marketing and offers suggestions and improvements or benefits for our website.

As Analytics is part of the variety of Google tools like Blogger, many bloggers still don’t know if it is possible to add the tracking code in Blogger. Implementing analytics in Blogger is very quick and easy, so you don’t need to be experts or web developers. Here’s a small guide for placing the Google Analytics tracking ID on our blog.


google analytics


Implementing Google Analytics on Blogger


1. Do you have a Google Analytics account? Then it’s perfect. If you don’t have one, please Register.
2. Within the account, we’ll go to Admin and in the Property column, click the menu, then click Create new property, where we enter the information from the website.


create new property in google analytics

3. Click on “Get Tracking ID” and it will provide a box with a code, select and copy the code (CTRL + C).


get google analytics tracking id

4. Now let’s go to our Blogger account.
5. Look for your blog and click on it, then go to Template > click the Edit HTML button and paste the code previously generated in Analytics before the tag (CTRL + F in order to find it).

And this would be the entire procedure. Within about 24 hours, we shall see the first statistics of our blog in Google Analytics, otherwise check the following:


– Double check that the code has no spaces or characters.
– Doesn’t have errors in the configuration
– There are no poor implementation of the filters.
– The Flash plugin is working or javascript is enabled.
– You will have minor issues if you are receiving visits from China (this conflict is not yet solved, according to Google).


‘+o+”


“)}b.innerHTML=f+=””+k,d.callBack()}};randomRelatedIndex=j,startRelated=k,f(d.blogURL.replace(/\/$/,””)+”/feeds/posts/summary”+i+”?alt=json-in-script&orderby=updated&max-results=0&callback=randomRelatedIndex”)}(window,document,document.getElementsByTagName(“head”)[0]);

//]]>

ADS SPACE

How to add Static Pages to a Blogger Blog (UPDATED)


A few months ago, Blogger has completely redesigned the section of the Pages, which now, looks very similar to that of the Blogger Posts. Now we will be able to manage the pages with more flexibility. For example, we can publish, delete or change many of them to draft at the same time – which has just the same function as the old Don’t show option.

Related: How to Create a Static Home Page in Blogger


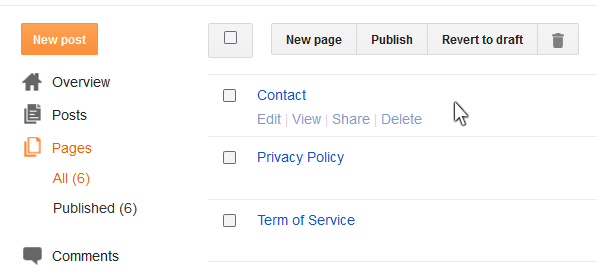
Among the options that we can find by hovering over a page and which we can see in the screenshot below are:


  • Edit: To access the editing panel and to edit its contents.

  • View: Open a new tab with the actual page.

  • Share: Share it on Google+ (which was not possible before).

  • Delete: remove a page.

add static pages on blogger

static pages, blogger

In order to create a page, we need to open the pages editor from the button that says New Page. Almost every option tells us its function.

How to add a Web Address in the Pages widget


Many Blogger users wanted to know how can we add other web addresses, so that they display in the list of the Pages widget, since this option no longer appears in the “Pages” tab?

This can be done by opening the settings of the Pages widget by going to “Layout”, then click on the “Edit” link in the widget / gadget for Pages (if you don’t have the Pages gadget, just click on the “Add a gadget” link and select “Pages” from the pop-up window). And from there, we will find the option that says: “Add link page” – here, we will have to type the Web Address in the second field every time we want to add a new page from a specific address or URL.


add web address, blogger tutorial

Another cool feature that has been built is that now it will be possible to add a search description, and in that field to add the text that we want to appear in search results. Until now, this option has been available only for blog posts.

search description for pages

This option will appear once you enable the “Enable search description?” option by choosing “Yes”. This will show up on “Meta Tags” by accessing the preferences for the search engines: “Settings” > “Search preferences” > “Meta Tags” > “Enable search description”?


‘+o+”


“)}b.innerHTML=f+=””+k,d.callBack()}};randomRelatedIndex=j,startRelated=k,f(d.blogURL.replace(/\/$/,””)+”/feeds/posts/summary”+i+”?alt=json-in-script&orderby=updated&max-results=0&callback=randomRelatedIndex”)}(window,document,document.getElementsByTagName(“head”)[0]);

//]]>
How To Set Custom Redirects in Blogger


Over time, most blogs may go through many changes, like posts being added or deleted. In some occasions, you don’t want people to get 404 messages when they navigate to posts or pages that don’t exist on your blog and instead, make all requests to a specific link to be redirected to another page. One of the best way to avoid broken links and keep your traffic flowing in the right direction is setting custom redirects via the Blogger Custom Redirects tool.

This tutorial will show you how to set custom redirects for Blogger posts and redirect an old URL to a new URL. But before redirecting any URL, you must know that there are two types of redirects:


  • A 302 redirect means that the page has moved temporarily. This redirect doesn’t pass the URL value to the new location and instead, it will take the visitors to an appropriate location so that you aren’t showing them a 404 page not found, or an error page. You can use a 302 redirect for coming soon pages or maintenance pages.

  • A 301 redirect means that a page has moved permanently to a new location. Use the 301 redirect when you deleted or changed the URL of your post. In most instances, the 301 redirects are always recommended for SEO because they will pass link juice (ranking power) to the redirected page and visitors will also benefit from this. However, 301s aren’t suitable when you change your custom-domain, because it only supports redirection within the same blog, not to an external URL.

Now that we’ve established which is which, let’s see how to set custom redirects for Blogger posts.

How to redirect old URL to new URL in Blogger


Step 1. Login to you Blogger account with email and password.

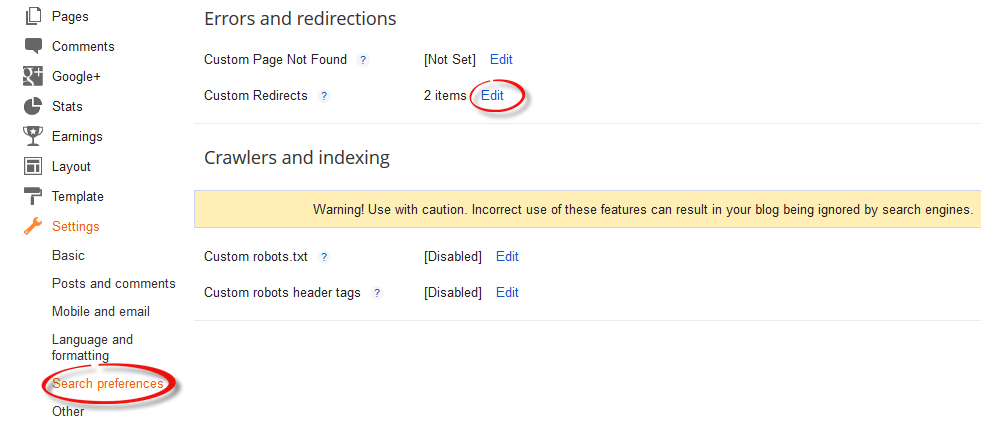
Step 2. Click on your blog > go to Settings \ Search Preferences and click “Edit” next to “Custom Redirects.”


search preferences, custom redirects, 301, 302 redirect

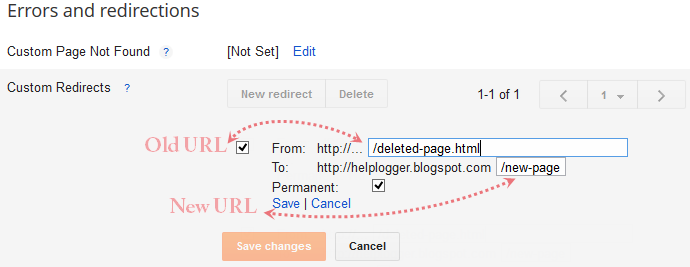
Step 3. Enter the old URL in the “From” field, and the new URL in the “To” field including the forward slash “/” (see the screenshot below)

custom redirects, redirect old url to new url

Note: Do not enter the full URL in these fields. Just omit the address of your blog and type only the rest of the link. Again, this works only if you wish to redirect within your blogger blog and not to any external links.

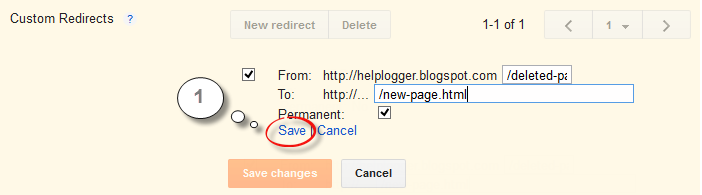
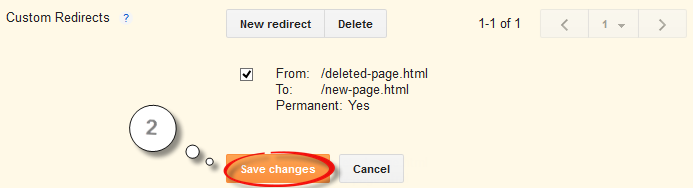
Step 4. Click the “Save” link (1) and the “Save changes” button (2), and you’re done!


blogger custom redirects

blogger custom redirect

If you want to redirect more pages, just click the “New redirect” button. Also, you can check out this tutorial to learn how to create a static homepage in Blogger using custom redirects.


‘+o+”


“)}b.innerHTML=f+=””+k,d.callBack()}};randomRelatedIndex=j,startRelated=k,f(d.blogURL.replace(/\/$/,””)+”/feeds/posts/summary”+i+”?alt=json-in-script&orderby=updated&max-results=0&callback=randomRelatedIndex”)}(window,document,document.getElementsByTagName(“head”)[0]);

//]]>

Customizable Related Posts Widget for Blogger

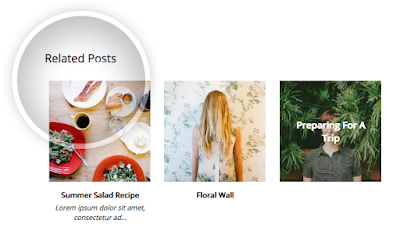
We already posted a few tutorials on how to add related posts widget with thumbnails in Blogger with summaries or only titles, which can be compiled into a single All-In-One Widget with powerful options. This new customizable related posts widget for Blogger integrates all the features we’ve seen before and more, such as thumbnails (square or round), post dates, excerpts, display only titles / thumbnails.

Now let’s see what this related posts blogger widget has to offer.


related posts widget, blogger widget

Related Posts Widget Features:


  • 9 attractive styles to match your needs

  • Show Title, excerpt & thumbnails

  • Display simple related posts with titles / summaries / post date

  • Choose whether to display the post thumbnails or not

  • Ability to control the thumbnail image size

  • Option to choose square or round thumbnails

  • Show post text excerpts

  • Control the length of the post excerpt / title

  • Determine the number of related posts to display

Requirements:


  1. The related posts widget recognizes post thumbnails uploaded through Blogger itself (or Picasa Web Albums), other images from Photobucket, Flickr, or other non-Blogger hosts will not be supported.
  2. This widget is compatible with the standard desktop Blogger templates except Dynamic Views, which does not accept customization.
  3. The script does not work on private blogs, so your blog / site must be open to the public in order to show.

Adding Customizable Related Posts Widget in Blogger


Log into your Blogger dashboard, go to ‘Template’ and open template editor by clicking the ‘Edit HTML’ button below ‘Live On Blog’ preview.

Next, we’re going to use the template search feature, be sure to follow these directions exactly:


1. Place your cursor on the template code.
2. Click once.
3. Press CTRL and F at the same time (PC) or Command and F (Mac).


The search box will open in the upper right corner of the template editor.


Type in the search box, then press ENTER. This will take you to the tag in your template and highlight it in yellow.

Select and copy the entire CSS style below and paste it directly ABOVE the tag:


How to Add Emoticons/Smileys in Blogger Comments


Emoticons or smiley faces are a great way to make comments more interesting and fun, so it’s a pity that Blogger doesn’t support them. In this tutorial, we will go through some simple steps to add these cool emoticons called Kolobok in Blogger/Blogspot comments, so that you and your blog visitors will be able to have an enjoyable time together.

UPDATE: Now available for threaded commenting system too!


emoticons in blogger, kolobok smileys, threaded comments

Adding Kolobok Emoticons or Smileys in Blogger Comments


Step 1. Log in to your Blogger account and go to ‘Template’, then click the ‘Edit HTML’ button:


Step 2. Click anywhere inside the code area and press the CTRL + F keys to open the search box


Step 3. Search (CTRL + F) for this tag:

Categories

Article How-to All Posts WordPress Android Web design Blogger Plugins CSS Google JQuery Plugins Programming Reviews Web Hosting Blogger Blogging Blogging Tips Tricks Web Development Facebook Git Internet Make Money Online Social Plugins Tips Tips and Tricks Tools Tutorials Windows WordPress Plugins Blogging Tips and Tricks Freebies GSM Google Analytics HTML How To's JavaScript Plugin Development S.E.O SEO SMS SmartPhone Social Media Tips amp; Tricks Top-Most Updates Webmaster Tools Whatsapp Applications Apps Blogger Basics Documentary Downloads Entertainment Gadgets Games Gmail Google AdSense Guest Post IPhone Make Money Blogging SVN Security Softwares Web Hosting Tips and Tricks Wordpress Tips Wordpress Tips and Tricks hostgator iOS Advertising Networks Advertising Technology Affiliates Antivirus Audience amp; Traffic Biography Blog post Blog post Blogger Blogger Errors Blogger Tips Blogger Tools Blogger Widget Blogosphere Bogger Widgets CSS selectors CSS symbols CSS3 Computer amp; Internet Content Writing Coupon Codes Data amp; Analytics Deleted blog Design DoubleClick for Publishers Email and newsletter marketting Email marketing Excel Tips Excel Tips and Tricks Facebook Tricks Feed Feedburner Feedburner subscribers Font Fun GitHub Giveaways Gmail primary inbox Gmail tabs Google sign-in Guides HTML amp; CSS HTML5 Infographics Inspirational Instagram Internet Marketing Internet Tips amp; Tricks Job Listings Knowledge Life Hacks Lists Make-Money Monetization amp; Conversion Monetize Navigation Online Marketing Other PHP Tutorials Passport Publishing amp; Content Quotes RSS Sidebar Smartphones Social Networking Status Tech Tech Blog Technology Telegram Themes UI / UX User Psychology amp; Research VB.Net Web Tools Web browser Widget Windows Tips Windows-10 ad viewability admin notice blogging tools bluehost cherry-pick clone cors custom scrollbar customizer dismissible notices duplicate post feed title git branch git clone gpg gpg2 hybridauth iPad icon font notice responsive wordpress theme same origin policy scrollbar signed git commit smartsvn theme customizer vcs wordpress theme wordpress themes

Blog Archive